Multiplexing with Simple Western
Introduction
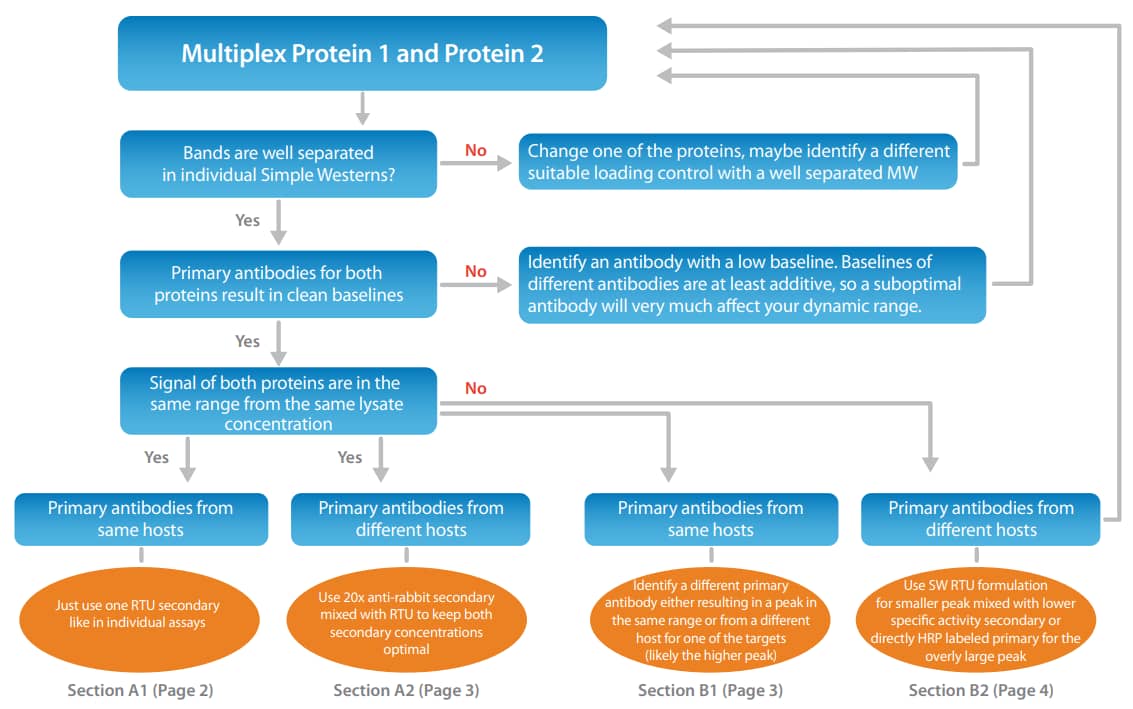
Simple Western gives you high quality, size-based data in just three short hours with only one hour of hands-on time. Plus, when you multiplex and look at two targets in one capillary you’ll double the number of data points you get per sample. So you can get more out of your precious samples and save some time too. In addition, if you multiplex your target with a biological loading or system control to normalize your signal, your quantitation will be even more accurate.
In this "how to" guide, we’ll describe how to get your Simple Western multiplex assays up and running quickly and efficiently, and pass along some tricks we’ve picked up along the way on how to look at high and low expressing proteins at the same time.

Workflow overview

What you should consider when setting up a multiplexed Simple Western assay
Molecular Weight
Make sure the molecular weight of the proteins you want to multiplex are well separated and do not co-migrate. You can easily do this by running both proteins individually and then overlay the results in Compass for Simple Western. Baseline resolution should be the minimum requirement to attempt multiplexing.
Primary Antibody
Baseline contribution
Multiplexing of different proteins in Simple Western assays is based on mixing of the primary antibodies used. As in any immunoassay, when you mix primary antibodies, the baseline increase is at least additive, often more. That’s why it’s even more important to select excellent antibodies when multiplexing.
How to mix your primary antibodies
When you’re ready to multiplex, just mix the primary antibodies together using the volumes and concentrations you’d normally use to make sure your antibodies are all binding to saturation. Table 1 shows an example of how to mix primary antibodies when you’re multiplexing two proteins in the same capillary, so you’ll get two data points per 3–5 μL of sample.
Signal Size
To multiplex the signal of two different proteins in the same capillary, you’ll need to probe both proteins from the same lysate concentration. Ideally, the signals from your multiplexed proteins are approximately in the same range. We recommend running a quick titration experiment to make sure the proteins you want to multiplex are in the linear detection window at the same concentration using the same assay before you move on to a multiplexed assay. Multiplexing proteins with very different expression levels is described in sections B1 and B2.
Primary Antibody Host
For any assay, multiplexed or not, you want to be sure that both of the primary antibodies as well as the secondary antibodies are saturating. In the following sections, we will take you through the different signal size and primary antibody host combinations and give examples of how to multiplex those assays.
A: The Assays to be Multiplexed have Similar Signal Levels
A1. The primary antibodies were derived from the same host species
If the primary antibodies you want to multiplex are from the same host species, you can use one of the ready to use (RTU) secondary HRP conjugate for all signals, like you normally would for single target detection (Figure 1).

Figure 1. Multiplexing proteins using primary antibodies from the same host species. ERK1 and the system control antibody were mixed and detected with the RTU anti-rabbit secondary antibody.
| Reagent | Detecting Protein 1 Only | Detecting Protein 2 Only | Multiplexing Protein 1 and 2 |
|---|---|---|---|
| Primary antibody for Protein 1 | 1 μL (1:50) | N/A | 1 μL (1:50) |
| Primary antibody for Protein 2 | N/A | 2 μL (1:25) | 2 μL (1:25) |
| Antibody Diluent 2 | 49 μL | 48 μL | 47 μL |
Table 1. Example for mixing primary antibodies when setting up a multiplexed Simple Western run for two proteins.

Figure 2. Multiplexing proteins using primary antibodies from different host species. A significant signal decrease is observed when the RTU anti-mouse and RTU anti-rabbit secondary antibodies were mixed 1:1 (left) for ERK1 (rabbit anti-ERK1 RTU, PN 042-206) and STAT3 (mouse anti-Stat3, CST, 9139, 1:50). Using the 20X anti-rabbit secondary mixed into the RTU anti-mouse secondary (right) resulted in no change of saturation and yields equivalent results to individually run samples.
But be aware that in rare cases, primary antibodies can interact and slightly change the signal when moving from a singleplexed to a multiplexed approach.
A2. The primary antibodies were derived from different host species
If your primary antibodies are from different species, you’ll need to also mix your secondary antibodies. To achieve the most stable assay, you still need to make sure that not only the primary antibody but also the secondary antibody is at saturation so you do not lose signal or reproducibility.
| A. Primary Antibody Mix | ||
|---|---|---|
| Reagent | WES | SUE |
| Primary antibody for Protein 1 (1:50 dilution) | 5 μL | 4 μL |
| Primary antibody for Protein 2 (1:25 dilution) | 10 μL | 8 μL |
| Total volume of primary antibody mix | 250 μL | 200 μL |
| B. Secondary Antibody Mix (Using 20X Anti-Rabbit HRP) | ||
|---|---|---|
| Reagent | WES | SUE |
| RTU anti-mouse HRP | 237.5 μL | 190 μL |
| 20X anti-rabbit HRP | 12.5 μL | 10 μL |
| Total volume of secondary antibody mix | 250 μL | 200 μL |
Table 2. Examples for multiplexing assay setup. (A) An example of primary antibody preparation for multiplexing with Wes and Peggy Sue/ Sally Sue. This example assumes the saturating conditions for Protein 1 and 2 are 1:50 and 1:25, respectively. (B) Example of secondary antibody preparation using the 20X anti-rabbit HRP mixed with the RTU antimouse HRP for Wes and Sally Sue/Peggy Sue.
To prevent loss of signal saturation, we also now offer our Anti-Rabbit HRP antibody conjugate as a 20x formulation (PN 043-426). This enables you to have both secondary antibody concentrations at saturation. Figure 2 (left) shows a comparison of this recommended approach to simply mixing the two RTU secondary antibodies which halves their actual concentration. The multiplexed signals dropped by ~30-40% due to the lack of saturation of the secondary antibodies. In Figure 2 (right), we show the same setup, but here when mixing a 20x version of the anti-rabbit HRP into the RTU anti-mouse HRP, both secondary antibody conjugate concentrations are still saturating and the signals between individual results and the multiplexed approach are equivalent.
B. The Assays to be Multiplexed have Significantly Different Signal Levels
This is most commonly the case when housekeeping proteins are multiplexed with endogenous proteins of interest as biological loading controls.
B1: The primary antibodies were derived from the same host species
The best way to address significantly different expression levels and signal sizes in this case is to find another antibody for one of the proteins (likely the one with high signal, often the loading control) from a different species than the first antibody. If these signals are still significantly different from each other, you can apply any of the suggestions under section B2.

Figure 3. Comparison of Simple Western size and charge secondary antibodies on Wes. GAPDH was detected with an anti-rabbit GAPDH primary antibody then probed with either the Anti-Rabbit HRP RTU (PN 042-206 size secondary, shown in blue) or the Anti-Rabbit HRP charge secondary (PN 040-656, shown in orange). Shown on the right, this was also tested using the Anti-Mouse HRP RTU size (PN 042-205, shown in blue) and charge secondary antibodies (PN 040-655, shown in orange).
B2: The primary antibodies were derived from different host species
Generally, the recommended approach is to reduce the signal level for the highly expressed target while maintaining the stable equilibrium state for both the primary and the secondary antibody conjugate.
Option 1: Use a HRP-conjugated secondary with lower HRP load
Our RTU secondary HRP conjugates are designed to give maximum sensitivity. This is achieved by maximizing the HRP load (amount of HRP on the secondary antibody). The easiest way to reduce the sensitivity of any Simple Western assay (generally and in a multiplex situation) is to use a secondary antibody with lower HRP activity. As a first step, we recommend using the Simple Western charge secondary antibodies (Anti-Rabbit HRP PN 040-656, AntiMouse HRP PN 040-655) which in most cases will already significantly reduce your signal level (Figure 3). In this case, mix one of these secondary antibodies (diluted 1:100) into the RTU formulation needed for the low level protein.
Option 2: Further lowering signal by mixing unlabeled secondary with the HRP-conjugated secondary
If Option 1 doesn’t sufficiently reduce the signal for the highly expressed protein, it’s possible to further reduce the specific activity of the corresponding secondary antibody conjugate by mixing it with unlabeled secondary antibody. This will keep the kinetics and saturation level for this antibody consistent but will lower the specific activity.
| Secondary Antibody Ratio (COLD:HRP) | Affinipure Secondary Antibody (Unlabeled) | NP1000 20X Secondary Antibody (HRP Labeled) |
|---|---|---|
| 1:1 | 20 μL | 20 μL |
| 3:1 | 28 μL | 14 μL |
| 5:1 | 32 μL | 8 μL |
| 10:1 | 36 μL | 4 μL |
| 20:1 | 38 μL | 2 μL |
| 40:1 | 39 μL | 1 μL |
| 80:1 | 79 μL | 1 μL |
| 160:1 | 159 μL | 1 μL |
| 320:1 | 319 μL | 1 μL |
| 640:1 | 639 μL | 1 μL |
|
Instructions to make secondary antibody mixtures:
|
||
Table 3. Recommended titration scheme for mixing unlabeled secondary with HRP-conjugated secondary to further lower signal.

Figure 4. Titrating ratios of cold, unlabeled anti-mouse secondary with HRP-labeled secondary showed the signal at the 10:1 ratio was closest to the pAKT signal (left). Mixing decreased the signal, letting us pick the ratio that resulted in similar peak areas for our multiplexed proteins. Jurkat lysate was also titrated (right) to determine the assay linearity of GAPDH and pAKT when cold anti-mouse secondary antibody is mixed with labeled anti-mouse secondary antibody. The GAPDH and pAKT titration curves gave comparable linearity and slope, indicating that the 10:1 ratio of cold and labeled mouse secondary was optimal.
To do this, first mix different ratios of the cold (nonHRP labeled) secondary antibody with your labeled secondary antibody (keeping the total concentration of the antibody constant) to find the ratio that gives you a signal that’s similar to the protein target you plan to multiplex with. We tested this using the same model as before where we multiplexed 1:50 GAPDH (Novus, NBP2-27193) with 1:25 pAKT (CST, 9271) in 0.05 mg/ mL Jurkat lysates treated with Calyculin. Unlabeled anti-mouse secondary (Jackson ImmunoResearch Laboratories, 115-005-062) was mixed with HRP-labeled anti-mouse (ProteinSimple Anti-Mouse HRP, PN 040-655) at ratios between 5:1 to 640:1 of unlabeled:HRP labeled secondary (see Table 3 for mixing recommendations). The 10:1 ratio gave us a similar signal as pAKT (Figure 4, left). Adjusting the GAPDH signal by mixing in unlabeled anti-mouse secondary didn’t affect the pAKT signal we were multiplexing with. Mixing both types of secondary antibody decreased the GAPDH signal so both targets were in the same linear range (Figure 4, right). This approach gives you the flexibility to adjust any signal as needed. Note that the HRP labeled and cold ratio is varied and the optimal ratio for the assay has to be determined.
Similarly, the same can be done for rabbit secondary antibodies using unlabeled anti-rabbit IgG (Jackson ImmunoResearch, 111-005-045) and Anti-Rabbit HUX HRP Secondary Antibody, (ProteinSimple, PN 041-081). And since we’re all about simplifying your experiments, we looked at how stable a mixed secondary antibody cocktail will be so you don’t have to do it manually every time. Our testing showed that a 20X stock of mixed cold and HRP-labeled anti-mouse secondary from the suppliers noted was stable at 4° C for at least one month. Stability for secondary antibody mixtures using other suppliers has to be established.

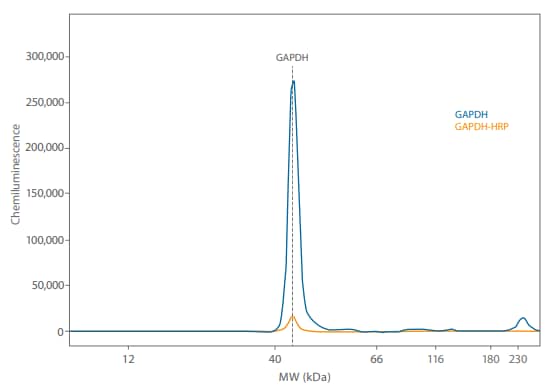
Figure 5. Direct and indirect detection of GAPDH in 0.05 mg/mL Jurkat lysate treated with Calyculin A. Direct detection lowers the signal and brings the signal level of this highly abundant protein down.

Figure 6. The GAPDH signal is very high when multiplexing (left) at the lysate concentrations needed to detect pAKT and has high potential for signal saturation. Direct detection of GAPDH (right) with an anti-GAPDH HRP antibody brings the chemiluminescent signal closer to the pAKT signal and does not compromise the pAKT signal.
Option 3: Lowering signal with HRP-conjugated primary antibodies to enable multiplexing
Another way of reducing your signal is using a directly HRP-labeled primary antibody. The signal reduction here is due to two factors: (1) less specific activity of the conjugate and (2) loss of amplification due to removal of the secondary antibody. While this approach is convenient, it doesn’t have the flexibility to dial in your signal as with Option 2.
To demonstrate the feasibility of this approach, we first compared indirect and direct detection of mouse GAPDH in 0.05 mg/mL Jurkat lysate treated with Calyculin A (CST, 9273). Both antibodies came from the same antibody clone to make sure we were comparing antibodies with the same binding kinetics and affinity. The antibodies were diluted 1:50 in Antibody Diluent 2 before plating in the primary antibody row in the sample plate followed by incubation with ProteinSimple’s RTU Anti-Mouse HRP or Antibody Diluent 2 for indirect and direct detection, respectively.
The chemiluminescent signal from the directly detected GAPDH using the HRP-conjugated anti-GAPDH was 30X less compared to the indirectly detected signal (Figure 5). Substituting a primary antibody with its HRP-conjugated counterpart is an easy way to decrease target signal so you’re in an optimal linear range while still saturating primary antibody binding for accurate, reproducible quantitation (for an example of the setup, see Table 4).
We then multiplexed GAPDH with pAKT in the same Jurkat lysate at 0.05 mg/mL. Indirect detection using 1:50 mouse anti-GAPDH (Novus, NBP2-27103) and 1:25 rabbit antipAKT (CST, 9271) primary and 20X anti-rabbit HRP diluted 1:20 into the RTU anti-mouse HRP secondary resulted in extremely high chemiluminescent GAPDH signal at a 5-second exposure compared to the pAKT signal (Figure 6, left). On the right panel of Figure 6, we show the same pAKT antibody, but GAPDH was detected with an anti-GAPDH HRP antibody (Novus, NBP2-27103H used at 1:50 dilution). The directly detected GAPDH signal with the HRP-conjugated primary antibody was much more comparable to the pAKT signal. The signal for pAKT in all of our experiments was equivalent, so we’re confident that the pAKT signal wasn’t affected by GAPDH no matter if or how we detected it.
| Reagent | WES | Peggy Sue/Sally Sue |
|---|---|---|
| Primary Antibody for Protein 1 (Rabbit) | 5 μL | 4 μL |
| HRP-Conjugated Primary Antibody for Protein 2 | 10 μL | 8 μL |
| Antibody Diluent | 235 μL | 188 μL |
| Total Volume of Primary Antibody Mix | 250 μL | 200 μL |
|
Assumes:
|
||
Table 4. Example setup for a multiplex containing an HRP-conjugated primary antibody

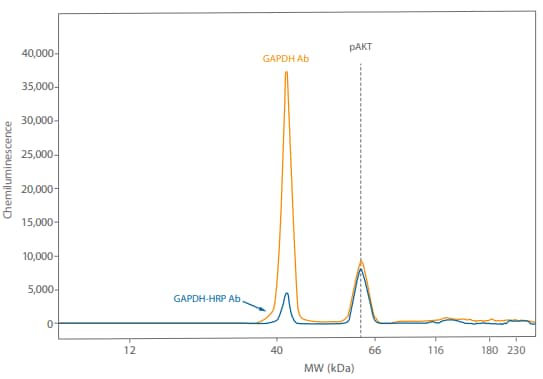
Figure 7. Direct detection of GAPDH using an HRP-conjugated primary antibody resulted in the GAPDH signal being much closer to the pAKT signal.
Just to make sure we’d see the same thing with a different antibody pair, we probed the same Calyculin A-treated Jurkat lysate (0.05 mg/mL) with 1:50 Rabbit anti-GAPDH (Novus, NB300-325 or Novus, NB300-326H) and 1:25 mouse pAKT (R&D Systems, MAB887). Again, the directly detected signal was closer to the pAKT signal, increasing 0 12 GAPDH Ab GAPDH-HRP Ab pAKT 40 66 116 180 230 40,000 35,000 25,000 30,000 20,000 10,000 15,000 5,000 Chemiluminescence MW (kDa) the range where signal from both targets is linear (Figure 7). So using direct detection to multiplex can help with different antibody pairs.
Conclusion
Multiplexing with Simple Western assays gives you more throughput by doubling the data points you can get per experiment. But to quantitatively multiplex, your targets need to be in the same linear range and careful optimization is needed. Once you’ve got that down, all you need to do is mix both primary antibodies together in one well and start your run. If you need to multiplex using primary antibodies raised in different host animals, just mixing the RTU secondary antibodies can decrease your signal by almost 40%. We found that mixing a 20X anti-rabbit secondary into the RTU anti-mouse secondary not only rescued the signal, it also gave us more flexibility when selecting antibodies to use for multiplexing.