Formalin-Fixed Paraffin-Embedded (FFPE) Sample Preparation and Pretreatment: For the RNAscope™ 2.5 Assay (PART 1)
Chapter 1. Product Information
Before using this product, read and understand the information in Appendix B. Safety on page 20.
IMPORTANT: We recommend reading the entire user manual before beginning any protocols.
About this guide
This user manual provides guidelines and protocols for the proper preparation and pretreatment of formalin-fixed, paraffin-embedded (FFPE) tissues mounted on slides. The slides can then be assayed using an RNAscope™ 2.5 Reagent Kit.
RNAscope™ 2.5 Reagent Kits come with a separate RNAscope™ 2.5 Assay User Manual. Do not perform an RNAscope™ 2.5 Assay without the correct user manual.
Visit the document download section on the product page to download RNAscope™ 2.5 Assay User Manuals.
Product description
Background
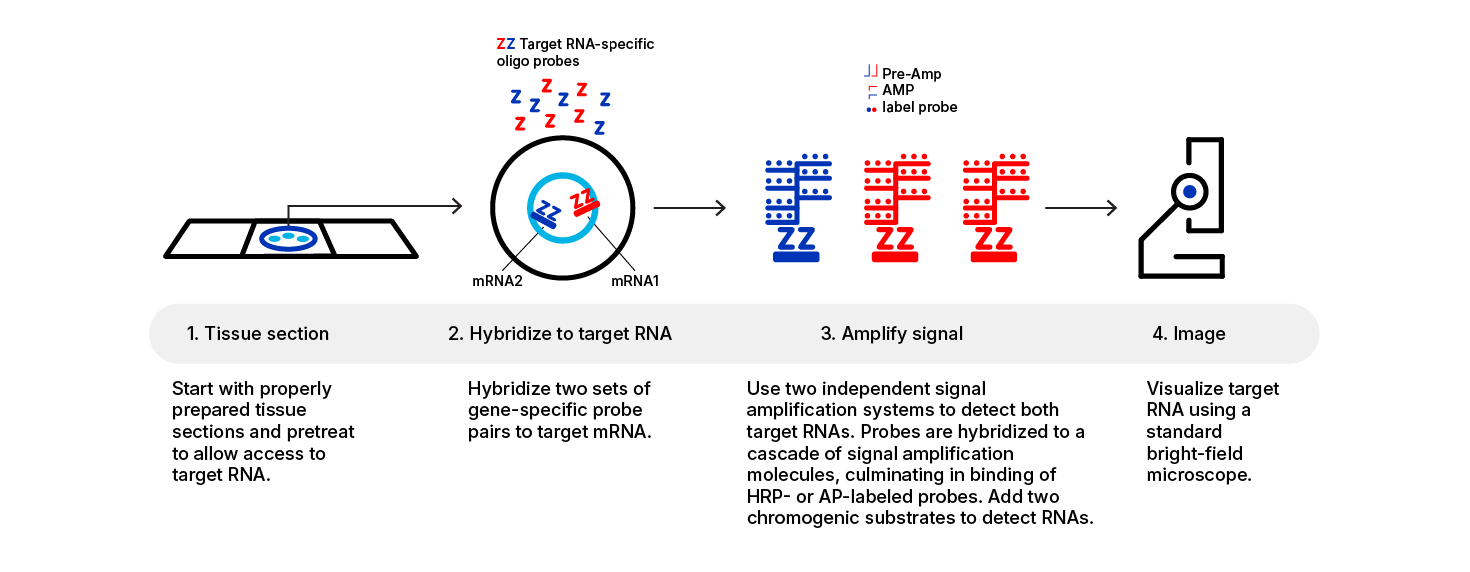
The RNAscope™ 2.5 Assays use a novel and proprietary method of in situ hybridization (ISH) to visualize single RNA molecules per cell in samples mounted on slides. The assays are based on ACD’s patented signal amplification and background suppression technology. Proprietary RNA-specific probes are hybridized to target RNA, and are then bound to a cascade of signal amplification molecules culminating in signal detection. Single-plex, 2-plex, multiplex, and automated assays are all available. The RNAscope™ 2.5 Assay procedure is illustrated in Figure 1 on page 6 and can be completed in 6–10 hours depending on the assay, or conveniently divided over two days. Most RNAscope™ 2.5 Assay reagents are available in convenient Ready‑To-Use (RTU) dropper bottles and provide a simple, nearly pipette-free workflow. Results are observable using standard bright field or fluorescent microscopy.
Sample types
In order to perform the RNAscope™ 2.5 Assays, you must start with properly prepared and pretreated samples. Multiple sample types are now compatible with RNAscope™ 2.5 Assays and include: formalin-fixed, paraffin-embedded (FFPE) tissues; fresh, frozen tissues; fixed, frozen tissues; tissue microarray (TMA); and cell samples.
Contact us for more information.

Figure 1. Procedure overview
Kit contents and storage
RNAscope™ 2.5 Assay Reagents
RNAscope™ Assays require RNAscope™ Probes and an RNAscope™ 2.5 Reagent Kit. RNAscope™ HD Assays offer the choice of two Detection Reagents, Brown (DAB) and Red (Fast Red), which enable RNA molecules to be visualized as brown or red chromogenic dots, respectively.
Use search to find a gene‑specific target probe and view our options for slides and control probes.
RNAscope™ 2.5 Reagent Kit
Each RNAscope™ 2.5 Reagent Kit provides enough reagents to stain ~20 tissue sections approximately 20 mm x 20 mm large. Larger tissue sections will result in fewer tests.
Each kit includes RNAscope™ Target Retrieval Reagents (Cat No. 322000) and separately, RNAscope™ Hydrogen Peroxide and RNAscope™ Protease Plus (Cat. No. 322330). Pretreatment instructions are provided in this guide. For information on the other reagents and directions for use, refer to an RNAscope™ 2.5 Assay User Manual. The reagents are stored as indicated in the following table:
| Reagent | Cat. No. | Quantity | Storage | |
|---|---|---|---|---|
| RNAscope™ Hydrogen Peroxide | 322335 | 3 mL x 2 bottles | 2–8°C | |
| RNAscope™ Protease Plus | 322331 | 4.5 mL x 1 bottle | 2–8°C | |
| RNAscope™ Target Retrieval Reagents | 322000 | 70 mL x 4 bottles | 15–30°C |
IMPORTANT: RNAscope™ 2.5 Reagent Kits share the same Wash Buffer, but have unique pretreatment reagents and Detection Kits. Do not interchange the reagent components of the Detection Kits, even those having the same name.
Required materials and equipment
The following materials and equipment are needed to perform the RNAscope™ 2.5 Assay.
HybEZ™ Hybridization System
IMPORTANT: The RNAscope™ 2.5 Assay has been verified using this system only.
The HybEZ™ Hybridization System (110 VAC, Cat. No. 310010; 220 VAC, Cat. No. 310013) is designed for the hybridization and incubation steps in the RNAscope™ 2.5 Assays. Incubation steps in the RNAscope™ 2.5 Assay require humid conditions to prevent sections from drying out.
For instructions on how to use the HybEZ™ Hybridization System, refer to the HybEZ™ Hybridization System User Manual available at www.acdbio.com/technical-support/user-manuals and view the training video. The system contains the follow components:
| Component | Quantity | Catalog # | |
|---|---|---|---|
| HybEZ™ Oven (110 or 220 VAC) | 1 oven | 310010 or 310013 | |
| HybEZ™ Humidity Control Tray (with lid) | 1 tray | 310012 | |
| HybEZ™ Slide Rack (20 slide capacity) | 1 rack | 310014 | |
| HybEZ™ Humidifying Paper | 2 sheets | — | |
| HybEZ™ Humidifying Paper Pack | 15 sheets | 310015 |
User-supplied materials
IMPORTANT: Do not substitute other materials for the ImmEdge™ Hydrophobic Barrier Pen and the SuperFrost® Plus Slides listed in the following table.
*Major Laboratory Supplier in North America. For other regions, please check Catalog Numbers with your local lab supplier.
Chapter 2. Before You Begin
Prior to running the RNAscope™ Assay on your samples for the first time, we recommend that you:
- View the video demonstrations available.
- Run the assay on FFPE RNAscope® Control Slides (Cat. No. 310045 for Human control slide, Hela; Catalog No. 310023 for Mouse control slide, 3T3) using the Positive and Negative Control Probes.
Important procedural guidelines
- Start with properly fixed and prepared sections.
- Use only samples mounted on SuperFrost Plus® Slides (Fisher Scientific; Cat. No. 12‑550‑15).
- Follow the recommended pretreatment conditions for your sample. Refer to Appendix A. Tissue Pretreatment Recommendation on page 17.
- Always run positive and negative control probes on your sample to assess sample RNA quality and optimal assay workflow.
- Do not substitute required materials. Assay has been validated with these materials only.
- Follow the protocol exactly for best results.
- Do not let your sections dry out during the procedure (except after Target Retrieval ethanol wash).
- Use good laboratory practices and follow all necessary safety procedures. Refer to Appendix B. Safety on page 20 for more information.
Chapter 3. Prepare and Pretreat Samples
Formalin-fixed, paraffin-embedded (FFPE) sample preparation and pretreatment are described in the following protocols. For other sample types and preparation methods, contact technical support for the latest protocols and guidelines.
IMPORTANT: We highly recommend following these guidelines. We cannot guarantee assay results with other preparation methods.
For suboptimally treated samples, you may need to optimize pretreatment conditions. Refer Appendix A. Tissue Pretreatment Recommendation on page 17in addition to troubleshooting.
Prepare FFPE sections
Materials required
|
|---|
Fix the sample
- Immediately following dissection, fix tissue in 10% NBF for 16–32 h at ROOM TEMPERATURE (RT). Fixation time will vary depending on tissue type and size.
CAUTION! Handle biological specimens appropriately.
IMPORTANT: Fixation for <16 h or >32 h will impair the performance of the RNAscope™ 2.5 Assay.
Dehydrate, embed, and cut the sample
IMPORTANT: Use fresh reagents.
- Wash sample with 1X PBS.
- Dehydrate sample using a standard ethanol series, followed by xylene.
- Embed sample in paraffin using standard procedures.
- Embedded samples may be stored at 15-25°C with desiccation. To better preserve RNA quality over long period (>1 yr), storing at 2-8°C with desiccation is recommended.
- Trim paraffin blocks as needed, and cut embedded tissue into 5 +/– 1 µm sections using a microtome.
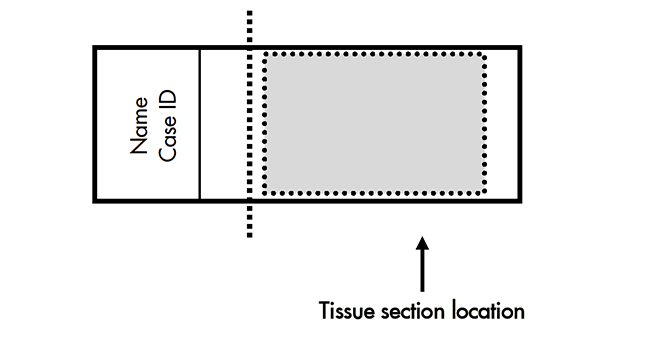
- Place paraffin ribbon in a 40–45°C water bath, and mount sections on SUPERFROST® PLUS SLIDES. Place tissue as shown for optimal staining:
- Do not mount more than one section per slide. Place sections in the center of the slide.
- Air dry slides OVERNIGHT at RT.
OPTIONAL STOPPING POINT. Use sectioned tissue within 3 months. Store sections with desiccants at RT.

Prepare FFPE slides for the RNAscope™ 2.5 Assay
- Do not use the HybEZ™ Oven.
Workflow
| Bake slides ~1 HR |
|---|
NOTE: Optional Stopping Point
| Deparaffinize FFPE sections ~20 MIN |
|---|
NOTE: Optional Stopping Point
Materials required
|
|---|
Bake slides
Bake slides in a dry oven for 1 h at 60°C.
OPTIONAL STOPPING POINT. Use immediately or store at RT with desiccants for ≤1 week. Prolonged storage may degrade sample RNA.
If you continue, prepare the materials for the following protocols while the slides are baking: Deparaffinize FFPE sections in the next section, Pretreat samples on page 12, and RNAscope™ 2.5 assay materials.
NOTE: If you choose the optional stopping point following Create a barrier on page 15, prepare the reagents for Pretreat samples and RNAscope™ 2.5 assay materials the next day.
Deparaffinize FFPE sections
Reagents may be prepared ahead of time. Ensure all containers remain covered.
- In a fume hood:
- Fill two Tissue‑Tek® Clearing Agent dishes with ~200 mL fresh Xylene.
- Fill two Tissue‑Tek® Staining dishes with ~200 mL fresh 100% Alcohol ( 95% Ethyl Alcohol and 5% Isopropyl Alcohol.
- Place slides in a Tissue‑Tek® Slide Rack and submerge in the first Xylene‑containing dish in the fume hood.
- Incubate the slides in Xylene for 5 min at RT. Agitate the slides by occasionally lifting the slide rack up and down in the dish.
- Remove the slide rack from the first Xylene-containing dish and immediately place in the second Xylene-containing dish in the fume hood.
- Repeat Step 3.
- Remove the slide rack from the second xylene-containing dish and immediately place in the dish containing 100% EtOH.
- Incubate the slides in 100% EtOH for 1 min at RT with agitation.
- Repeat Steps 6 and 7 with fresh 100% EtOH.
- Remove the slides from the rack, and place on absorbent paper with the section face-up. Air dry slides for 5 min at RT (or until completely dry).
Pretreat samples
IMPORTANT: Before you begin, make sure you know the pretreatment conditions specific to your sample type from Appendix A. Tissue Pretreatment Recommendation on page 17.
Workflow
- Prepare 1X RNAscope™ Target Retrieval Reagents ~10–20 min
- Apply RNAscope™ Hydrogen Peroxide ~10 min
- Apply RNAscope™ Target Retrieval Reagents ~10–30 min
- Create a barrier ~15 min
NOTE: Optional Stopping Point - Apply RNAscope™ Protease Plus ~30–60 min
PROCEED IMMEDIATELY TO RNASCOPE™ 2.5 ASSAY
Materials required
| Materials provided by the RNAscope™ 2.5 Reagent Kit | Other Materials and Equipment |
|---|---|
|
|
Equilibrate equipment
- Turn on HybEZ™ Oven and set temperature to 40°C.
- Place a Humidifying Paper in the Humidity Control Tray and wet completely with distilled water.
- Insert covered tray into oven and close the oven door. Warm the tray for 30 min at 40°C before use. Keep the tray in the oven when not in use.
Prepare 1X RNAscope™ Target Retrieval Reagents
Please refer to Appendix B. Target Retrieval Using the Oster® Steamer on page 19 for information on an alternate highly recommended method known as the target retrieval method using the Oster® Steamer.
IMPORTANT: Do not boil the 1X RNAscope™ Target Retrieval Reagents more than 30 MIN before use.
- Prepare 700 mL of fresh RNAscope™ 1X Target Retrieval Reagents by adding 630 mL distilled water to 1 bottle (70 mL) 10X Target Retrieval Reagents in the beaker. Mix well.
- Place the beaker containing RNAscope™ 1X Target Retrieval Reagents on the hot plate. Cover the beaker with foil and turn the hot plate on high for 10–15 min.
- Once 1X RNAscope™ Target Retrieval Reagents reaches a slow boil (98–102°C), turn the hot plate to a lower setting to maintain the correct temperature. Check the temperature with a thermometer.
Apply RNAscope™ Hydrogen Peroxide
- Lay deparaffinized slides on the bench and add ~5–8 drops of RNAscope™ Hydrogen Peroxide to cover the entire section.
- Incubate slides for 10 min at RT.
- Remove RNAscope™ Hydrogen Peroxide solution from one slide at a time by tapping and/or flicking the slide on absorbent paper. Immediately insert the slide into a Tissue-Tek® Slide Rack submerged in a Tissue-Tek® Staining Dish filled with distilled water.
- Wash slides 3–5 times by moving the Tissue-Tek® Slide Rack up and down in the distilled water.
- Repeat Step 4 with fresh distilled water.
Apply RNAscope Target Retrieval Reagents
- With a pair of forceps very slowly submerge the slide rack containing the slides into the boiling RNAscope™ 1X Target Retrieval Reagents solution. Cover the beaker with foil and boil the slides for the amount of time specified by the table in Appendix A. Tissue Pretreatment Recommendation on page 17.
- Use the forceps to immediately transfer the hot slide rack from the RNAscope™ 1X Target Retrieval Reagents to the staining dish containing distilled water. Do not let the slides cool in the Target Retrieval Reagents solution.
- Wash slides 3–5 times by moving the Tissue-Tek® Slide Rack up and down in the distilled water.
- Wash slides in fresh 100% EtOH and allow the slides to dry completely at RT.
Create a barrier
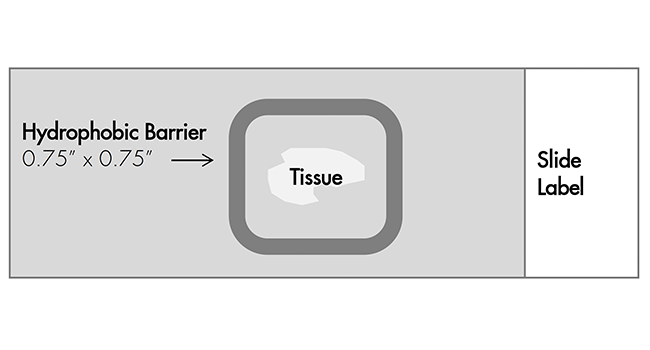
Use the following template to draw a barrier 2–4 times around each section with the Immedge™ hydrophobic barrier pen.
IMPORTANT: Do not let the barrier touch the tissue section. An Immedge™ hydrophobic barrier pen is highly recommended. An alternative type of pen may result in suboptimal results. Do not let the barrier touch the tissue section.
NOTE: We do not recommend drawing a smaller barrier and using less than the recommended volume amounts, even for smaller sections. Larger barriers will result in fewer tests per kit.
Let the barrier dry completely ~1 min or OVERNIGHT at RT.
NOTE: If you need to reapply the hydrophobic barrier during the following procedures, dry the appropriate area of the slide with a kimwipe. Do not touch the tissue section.
OPTIONAL STOPPING POINT. Dry slides overnight for use the following day, or proceed directly to the next section.

Apply RNAscope™ Protease Plus
- Place dried slides on the HybEZ™ Slide Rack, and add ~5 drops of RNAscope™ Protease Plus to entirely cover each section.
Remove the HybEZ™ Humidity Control Tray from the HybEZ™ Oven and place the HybEZ™ Slide Rack in the tray. Close the lid, seal, and insert tray back into the oven. Incubate at 40°C for the amount of time specified by the table in Appendix A. Tissue Pretreatment Recommendation on page 17.
NOTE: If needed, prepare RNAscope™ 2.5 assay materials during this step.
- Remove the HybEZ™ Humidity Control Tray from the oven. Remove the HybEZ™ Slide Rack from the tray. Place tray back into the oven.
- Take each slide one at a time from the HybEZ™ Slide Rack and tap/and or flick to remove the excess liquid. Immediately place each slide in a Tissue-Tek® Slide Rack submerged in a Tissue-Tek® Staining Dish filled with distilled water.
- Wash slides 3–5 times by moving the Tissue-Tek® Slide Rack up and down in the distilled water.
Proceed to the RNAscope™ 2.5 Assay
While the slides are incubating, proceed immediately to an RNAscope™ 2.5 Assay. Ensure you have the appropriate user manual. User manuals are available in the document download section on each product page.
Troubleshooting
For troubleshooting information, please contact technical support.
Appendix A. Tissue Pretreatment Recommendation
Follow the recommended pretreatment conditions based on your tissue type for:
- Any new or previously untested FFPE tissue types.
- Samples prepared differently than the sample preparation protocol found in Formalin-Fixed Paraffin-Embedded (FFPE) Sample Preparation and Pretreatment, Part 1 (Document No. 322452-USM).
Tissue pretreatment recommendation
- Stain representative samples using the positive and negative control probes.
Fix sample in fresh 10% NBF for 16–32 HRS at RT.
NOTE: Perform tissue fixation step using the recommended amount of time. Over or under-fixation will result in significant signal loss when performing the RNAscope™ Assay.
- Depending on your tissue type (see section below), vary the amount of time for the Target Retrieval Reagents and/or Protease Plus.
| Reagent | Mild | Standard | Extended |
|---|---|---|---|
| RNAscope™ Target Retrieval Reagents | 15 MIN | 15 MIN |
|
| RNAscope™ Protease Plus | 15 MIN | 30 MIN |
|
NOTE: Some sample types, such as certain Xenografts and Cell Pellets, may require less time. For these tissue types, vary the RNAscope™ Target Retrieval Reagents time to 8 MIN and RNAscope™ Protease Plus time to 15 MIN. If you have a tissue type not listed, contact our Technical Services.
Tissue-specific pretreatment conditions
For suboptimally treated samples, you may need to optimize pretreatment conditions. Refer this document and information provided on our troubleshooting page.
If your sample fixation is successful in fresh 10% NBF (Step 2 above), then refer to the following table for tissue-specific pretreatment conditions. For information about species or tissue type not listed here, contact technical support.
| Species | Tissue Type | Pathology | Pretreatment Condition |
|---|---|---|---|
| Mouse/Rat | Intestine | Normal |
|
| Intestine | Tumor |
| |
| Embryo | Normal |
| |
| Brain |
|
| |
| Spleen |
|
| |
| Eye/Retina |
|
| |
| Liver |
|
| |
| Kidney |
|
| |
| Breast |
|
|
| Colon | Tumor |
| |
| Colon | Normal |
| |
| Lung |
|
| |
| Lung |
|
| |
| Prostate |
|
| |
| Prostate |
|
| |
| Lymph node |
|
| |
| Lymph node |
|
| |
| Tonsil |
|
| |
| Pancreas |
|
| |
| Cervical |
|
| |
| Cervical |
|
| |
| Cervical dysplasia |
|
| |
| Brain |
|
| |
| Brain |
|
| |
| Head |
|
| |
| Neck |
|
| |
| Liver |
|
| |
| Kidney |
|
| |
| Skin |
|
| |
| Melanoma |
|
| |
| Nevus |
|
| |
| Placenta |
|
| |
| Skin (TMA*) |
|
| |
| Breast (TMA) |
|
| |
| Melanoma (TMA) |
|
| |
| Nevus (TMA) |
|
| |
| Stomach (TMA) |
|
| |
| Stomach (TMA) |
|
| |
| Cell pellets, fixed with 10% NBF |
|
| |
| HeLa cells, fixed with 10% Formaldehyde/PBS/ACD Control |
|
|
Appendix B. Target Retrieval Using the Oster® Steamer
This procedure details using Oster® Steamer Model 5709 and a digital thermometer for precise temperature control.
- Steaming with the Braun Multiquick FS-20 Steamer is possible. Users of the Braun Multiquick FS 20 Steamer are instructed to both fill the water to the maximum level before starting and to not refill water during pretreatment steaming.

Prepare the steamer
NOTE: Do not overfill.
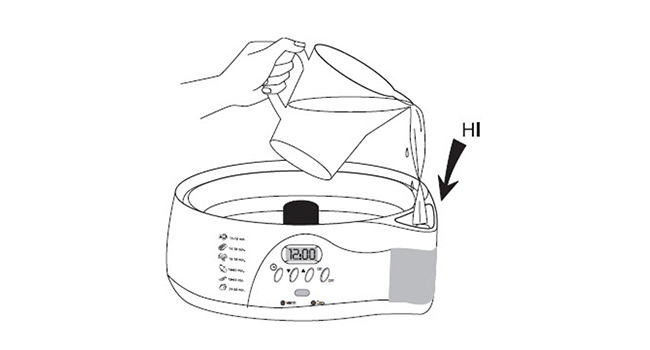
- Fill the water reservoir with cold tap water to the “HI” marking line.
- Place a clear Steaming Bowl onto the base.
- Place two slide holders in the steam bowl. Fill one slide holder with 200 mL of Target Retrieval Reagents. Fill the other slide holder with 200 mL of distilled H20.
- Turn on the Steamer. Set the steamer timer by turning the black knob clockwise. Set heating time to 95 MIN.
- Insert a digital thermometer through the holes of the lid and into the container containing Target Retrieval Reagents. Allow temperature to rise to at least 99°C.
- Add slides to the container containing distilled H20 for 10 seconds to acclimate slides.
- Remove slides and move them to the container containing Target Retrieval Reagents (Cat. No. 322200). Cover the Steamer with lid.
- Start timer for 15 MIN for mild and standard conditions, 30 MIN for extended. Please consult the Tissue Pretreatment table in Appendix A. Tissue Pretreatment Recommendation on page 17.
- Remove slides from steamer and transfer to a separate rinse container with 200 mL of distilled water. Allow slides to rinse for 15 SEC.
- Transfer slides to 100% alcohol for 3 MIN.
- Dry slides in 60°C incubator (or at room temperature).
- Draw hydrophobic barrier and continue with RNAscope™ assay.
Chemical safety
WARNING: GENERAL CHEMICAL HANDLING. To minimize hazards, ensure laboratory personnel read and practice the general safety guidelines for chemical usage, storage, and waste provided below, and consult the relevant SDS for specific precautions and instructions:
- Read and understand the Safety Data Sheets (SDSs) before you store, handle, or work with any chemicals or hazardous materials. SDSs, can be found at in the document download section of product pages.
- Minimize contact with chemicals. Wear appropriate personal protective equipment when handling chemicals (for example, safety glasses, gloves, or protective clothing).
- Minimize the inhalation of chemicals. Do not leave chemical containers open. Use only with adequate ventilation (for example, fume hood).
- Characterize (by analysis if necessary) the waste generated by the particular applications, reagents, and substrates used in your laboratory.
- Ensure that the waste is stored, transferred, transported, and disposed of according to all local, state/provincial, and/or national regulations.
- IMPORTANT! Radioactive or biohazardous materials may require special handling, and disposal limitations may apply.
Biological hazard safety
WARNING: BIOHAZARD. Biological samples such as tissues, body fluids, infectious agents, and blood of humans and other animals have the potential to transmit infectious diseases. Follow all applicable local, state/provincial, and/or national regulations. Wear appropriate protective equipment, which includes but is not limited to: protective eyewear, face shield, clothing/lab coat, and gloves. All work should be conducted in properly equipped facilities using the appropriate safety equipment (for example, physical containment devices). Individuals should be trained according to applicable regulatory and company/institution requirements before working with potentially infectious materials. Read and follow the applicable guidelines and/or regulatory requirements in the following:
In the U.S.:
- U.S. Department of Health and Human Services guidelines published in Biosafety in Microbiological and Biomedical Laboratories found at: www.cdc.gov/biosafety
- Occupational Safety and Health Standards, Bloodborne Pathogens (29 CFR§1910.1030),
found at: www.access.gpo.gov/nara/cfr/waisidx_01/%2029cfr1910a_01.html - Your company’s/institution’s Biosafety Program protocols for working with/handling
potentially infectious materials. - Additional information about biohazard guidelines is available at: www.cdc.gov/
In the EU:
- Check local guidelines and legislation on biohazard and biosafety precaution and refer to the best practices published in the World Health Organization (WHO) Laboratory Biosafety Manual, third edition, found at: www.who.int/csr/resources/publications/biosafety/WHO_CDS_CSR_LYO_2004_11/en/
- Information about the Registration, Evaluation, Authorisation and Restriction of Chemicals (REACH) can be found at: echa.europa.eu/regulations/reach
Documentation and Support
Obtaining SDSs
Safety Data Sheets (SDSs) are available in the document download section of each product page. For the SDSs of chemicals not distributed by Advanced Cell Diagnostics, contact the chemical manufacturer.
Obtaining support
For the latest services and support information, contact our Technical Services.
At the website, you can:
- Access telephone and fax numbers to contact Technical Support and Sales facilities.
- Search through frequently asked questions (FAQs).
- Submit a question directly to Technical Support.
- Search for user documents, SDSs, application notes, citations, training videos, and other product support documents.
- Find out information about customer training events.
Limited product warranty
Advanced Cell Diagnostics, Inc. and/or its affiliate(s) warrant their products as set forth in the ACD General Terms and Conditions of Sale found here. If you have any questions, please contact us.